
Permissions and security
HARi controls access with teams and roles. Every record belongs to a team. A role attached to that team says what members may do, and whether that right stops at the team, the business unit, or the whole workspace. The person named Owner is who follows up — they are not, by themselves, the lock.
Verizon’s 2024 Data Breach Investigations Report found the human element was a component of 68% of breaches (Verizon, 2024 DBIR). The practical CRM answer is the one you can explain on a record: click Who can see this? and read the names.
Where do I set this?
Section titled “Where do I set this?”Settings → Access:
- Roles — what a person may do (Create, View, Edit, Delete, Reassign) and how far
- Users — invite people and pick the team they join
- Teams — who is in the group, which roles they carry, which records they hold
- Business Units — folders of teams, when one workspace has more than one wall
- Access Inspector — one person, or one record
Start with teams and roles. Then who can see what, private records, business units, and export monitoring.
Roles, not profiles
Section titled “Roles, not profiles”Older docs called these permission profiles. The product now says roles. Same idea, different word: a named bundle of rights, attached to a team, not typed onto each user.
Typical starting points:
| Starting point | What it is for |
|---|---|
| Baseline | See the team’s own records, change nothing |
| Viewer | See the business unit, change nothing |
| Editor | Create and edit the team’s records; cannot reassign |
| Manager | Edit the business unit, including moving records to another team |
| Administrator | Every record, plus security administration |
You can create as many named roles as you need (CRM Viewer, Billing Manager). Details: set up role permissions.
Record ownership is a team
Section titled “Record ownership is a team”The team that holds the record is the security boundary. New records take your default working team. Change team moves them. Make private moves them onto your personal team.
The Owner line under the title is the responsible person. Reassign and Claim change that person. They do not change who can see the row. Harvard Business Review found firms that contacted a new lead within an hour were nearly 7 times as likely to qualify it as those that waited even an hour longer (Harvard Business Review, “The Short Life of Online Sales Leads”, 2011). Owner is that follow-up name. The lock is the team.
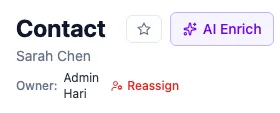
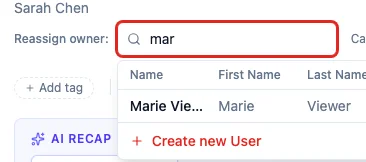
Reassigning the responsible person
Section titled “Reassigning the responsible person”- Open the record and find Owner under the title.
- Click Reassign.
- Type a teammate’s name and pick them.
The change saves when you choose someone and is written to History.
Claiming an unassigned record
Section titled “Claiming an unassigned record”A record with no Owner shows Claim. Click it to put your name on follow-up. That still does not move the record to your personal team.
Who can reassign Owner vs who can change team
Section titled “Who can reassign Owner vs who can change team”- Changing Owner needs Edit on that record.
- Moving the record to another team, or making it private, needs Reassign on the role. An Editor does not get that by default.
Capabilities
Section titled “Capabilities”On a role, extra checkboxes cover workspace-wide actions:
- Export records — download a CSV (still limited to rows you can view). See export monitoring.
- Import records
- Mass update / Mass delete
- View audit log
- Access admin panel, Edit schema, Manage API keys
- Security administration — roles, teams, units, invitations that change access
Seeing and reassigning the owner
Section titled “Seeing and reassigning the owner”The Owner line under the title is the responsible person. Reassign and Claim change that person. They do not change who can see the row — that is the team. Same steps as Reassigning the responsible person.
Deactivating a user
Section titled “Deactivating a user”Settings → Access → Users, then deactivate. Team-owned records stay on the team — colleagues keep working them. Records on the leaver’s personal team are moved, with a warning about who will newly see them, so nothing is stranded and nothing is silently widened. You pick a successor. The audit log records the move.
Reactivating a user
Section titled “Reactivating a user”Reactivating a user turns login back on. Records that were moved do not slide back by themselves. Team memberships stay as they were.
Audit log
Section titled “Audit log”Every change is recorded: who, when, old value, new value, which record. Open the History tab on the record. Retention is configurable; old months can be dropped.
Best practices
Section titled “Best practices”- Start from a starting point, then narrow — do not begin at Administrator.
- Put people on a work team on day one so their first records are not silently private.
- Use Who can see this? before you promise a colleague they can open a row.
- Watch Export Logs after someone leaves.
- Keep the Administrator count small.