
HARi Email — send from your own domain
HARi Email is the sending method that comes with your plan. HARi runs the delivery infrastructure, so you can send from your own address without buying, renting, or configuring a mail server. The one thing it needs from you is proof that the domain you send from is really yours — a receiving mail server has no other way to tell your message apart from someone forging your address, and unproven mail goes to the spam folder.
That proof is three DNS records. This page explains what each one does, who adds them, and what to do when one doesn’t pass.
What HARi Email costs you
Section titled “What HARi Email costs you”HARi Email draws on your plan’s sending allowance — roughly 100 emails a month on the Free plan (with a 10-per-day safety cap), roughly 2,000 a month on a paid plan, and a shared balance with your AI usage. You are never billed per email, and nothing breaks at the cap: sending pauses and resumes on its own. See Email sending allowance for the full numbers.
Your account’s current limits are shown in Settings → Email Sending (called Outbound Email in earlier versions):
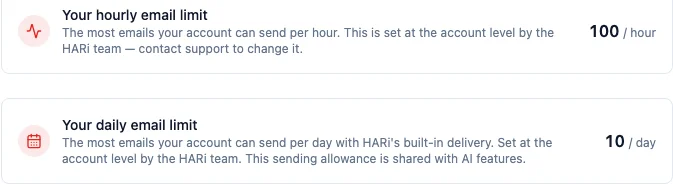
If those numbers are too tight for how you work, the other three sending methods — Outlook, your own SMTP server, or Plunk — run on your email account, send unlimited volume, and never draw on your HARi allowance.
Why does my domain need to be verified?
Section titled “Why does my domain need to be verified?”Because nothing in an email address is self-proving. Anyone can put you@yourcompany.com in the From line of a message, and mailbox providers know it — so they don’t trust the address, they check the domain’s DNS for a published statement that the sending server is authorised. Without that statement your mail looks exactly like a forgery of your own brand, and it is treated accordingly.
This is not a preference that providers may or may not apply. Since 1 February 2024, Google requires it of every bulk sender: “email senders who send more than 5,000 messages per day to Gmail accounts must meet the requirements in this section” — which include setting up SPF and DKIM authentication for the sending domain and publishing a DMARC record, the policy line that tells receiving servers what to do with mail that fails those checks (Google, Email sender guidelines). Microsoft followed from 5 May 2025 for Outlook.com, first routing unauthenticated high-volume mail to Junk and then refusing it with 550; 5.7.515 Access denied, sending domain [domain] does not meet the required authentication level (Microsoft, Outlook’s New Requirements for High-Volume Senders).
Verification is also what keeps your own reputation yours. Google’s guidelines tell senders to “Keep spam rates reported in Postmaster Tools below 0.30%” — and a spam rate is only measurable against an authenticated domain. Verify once, and the good behaviour of your mail accrues to your domain instead of being lost in an anonymous pool.
Who sets HARi Email up?
Section titled “Who sets HARi Email up?”HARi does. Managed delivery is provisioned for your account by the HARi team, not switched on from the settings page — so on most workspaces the HARi Email card is informational: it tells you the method exists and what your limits are, and there is nothing to fill in.
You can tell whether it is switched on for you from Settings → Email Sending. Open the HARi Email card there — the button on the right of it reads Set up, or Manage once the method is in use. If HARi Email is provisioned for your workspace, the card shows your delivery details, your daily allowance, and — if you are an administrator — a sending domain field followed by three CNAME records. That is the flow this page describes. If the card instead reads Not switched on for this workspace yet, managed delivery hasn’t been provisioned: ask us to switch it on, or follow SMTP or Plunk for the provider you already have.
The SPF and DMARC records you may see elsewhere on the same page are not part of HARi Email. They live inside the Your own SMTP server and Plunk cards further down, because a domain you send from on your own mail account is authenticated differently.
Note — You can start sending today without waiting on any of this: Outlook, SMTP, and Plunk all run on your own account and need nothing switched on by HARi.
Adding and verifying a sending domain is an administrator action. If you aren’t an admin on the workspace, ask whoever administers your HARi account to do this part.
The three records you add to your DNS
Section titled “The three records you add to your DNS”A DNS record is a line in your domain’s public address book. Your domain is registered somewhere (Cloudflare, GoDaddy, Gandi, OVH, IONOS, your web host), and that provider has a page where you can add lines to it. All three records below are the same type, CNAME — a CNAME simply says “this name is an alias for that other name”, which lets HARi keep the underlying values up to date without you ever touching DNS again.
| Record | Where it goes | What it does | Required |
|---|---|---|---|
| CNAME | <selector>._domainkey.yourdomain.com | DKIM. Lets HARi cryptographically sign your outgoing mail, and lets the recipient’s server check that signature against your domain. This is the record that proves the mail is genuinely authorised by you. | Yes |
| CNAME | <label>.yourdomain.com | Return-Path. Gives bounces and complaints somewhere to come back to, so HARi can tell you which addresses are dead. It also satisfies SPF — the older check, where a domain publishes which servers are allowed to send for it. | Yes |
| CNAME | link.yourdomain.com | Link tracking. Rewrites links in your emails through your own domain so click statistics work. Skip it if you don’t want click tracking — everything else still works. | No |
HARi generates the exact host and value for your domain and shows both with a copy button next to each. Never retype them by hand; a single wrong character is the most common reason verification fails.
Tip — Send from a subdomain:
mail.yourcompany.comrather thanyourcompany.com. That keeps your marketing reputation separate from the reputation of the mailbox you use for everyday business, so a bad campaign can never affect whether your invoices reach people.
Adding the records, step by step
Section titled “Adding the records, step by step”-
Open Settings → Email Sending in HARi, then open the HARi Email card — click Manage (or Set up) on the right of it. Everything below happens inside that card, which is usually already open if your workspace sends with HARi Email.
-
Type the domain you want to send from — for example
mail.yourcompany.com— and click Add domain. Enter the domain only: nohttps://, no trailing slash. -
Leave the HARi tab open. The card now lists your three records, each with a Host / Name, a Value / Content, and a copy button.
-
In a second tab, sign in to your DNS provider and find its DNS records page. It’s usually under a heading like DNS, DNS records, Zone editor, or Advanced DNS. If you don’t know who your DNS provider is, it is normally whoever you bought the domain from, or whoever hosts your website.
-
Add each record. Choose type CNAME, paste the Host / Name from HARi into the name field, paste the Value / Content into the target field, and save. Leave TTL at its default.
Most providers expect the host relative to your domain (paste
mail._domainkey, notmail._domainkey.yourcompany.com) and add the domain part for you — and the relative form is exactly what HARi gives you to copy. If your provider insists on the full name instead, add your own domain to the end of it yourself:mail._domainkeybecomesmail._domainkey.yourcompany.com. -
Go back to HARi and click Verify on the domain’s row. Each record gets its own status: Verified, Pending, or Failed, with a line explaining where that record stands.
-
When the two required records pass, the domain shows Verified and HARi offers to make it your default sender address — click Use this domain to switch, or Keep current to leave your existing From address alone.
DNS changes can take up to 24 hours to spread across the internet, though in practice most providers publish in a few minutes. Verifying immediately after saving and seeing “Failed” is normal and does not mean you did anything wrong.
When verification doesn’t pass
Section titled “When verification doesn’t pass”Work through these in order. Each row is a real cause, most common first.
| What you see | What it usually means | What to do |
|---|---|---|
| ”We couldn’t find this record in your DNS yet” | Either the record hasn’t propagated, or it was saved on the wrong domain | Wait an hour and verify again. If it’s still missing, check you added it to the same domain you typed into HARi — a record on yourcompany.com will never verify mail.yourcompany.com |
| Verification fails on one record only | A copy/paste slip: a missing character, a trailing space, or a trailing dot | Delete that record at your DNS provider and re-add it, copying host and value with HARi’s copy buttons |
| ”Found in your DNS — waiting for the provider to confirm it” | The record is correct and the check is still settling | Nothing. Verify again in an hour |
| Your provider rejects the host as invalid | The provider wants the relative name, and you pasted the full one (or the reverse) | Try the other form — paste mail._domainkey instead of mail._domainkey.yourcompany.com, or vice versa |
| Your provider says the record conflicts with an existing one | There’s already a record at that exact name | Look for an old entry at the same name from a previous email tool and remove it, then re-add |
| Only the link-tracking record fails | That record is optional | Ignore it, or remove it. Your domain still verifies and your mail still sends — you just don’t get click statistics |
| The records you’re asked for are an SPF (TXT) and a DMARC record, not three CNAMEs | You have the Your own SMTP server or Plunk card open, not the HARi Email one — those methods send on your own account and authenticate the domain differently | Close that card and open HARi Email instead. If your own account is the method you want, follow SMTP / Plunk |
| The HARi Email card reads “Not switched on for this workspace yet” | Managed delivery hasn’t been provisioned for your workspace, so there is no domain to verify here yet | These steps don’t apply yet. Email support@haricrm.com to have HARi Email switched on, or use SMTP / Plunk with the provider you already have |
| The card says “Only a workspace admin can change this” | You aren’t an administrator on the workspace | Ask whoever administers your HARi account to add and verify the domain |
If everything above checks out and verification still fails after 24 hours, contact HARi support with the domain name — the per-record status lines tell us exactly which check is unhappy.
Would you rather send from your own account?
Section titled “Would you rather send from your own account?”HARi Email is the fastest way to start, and for most small businesses it is enough. Switch to one of these when you want volume beyond your plan allowance, or when you’d rather your mail leave through infrastructure you already own:
- Outlook / Microsoft 365 — sign in once, no DNS work at all, sends as your real Outlook identity. The easiest option if your team already uses Microsoft 365.
- Your own SMTP server — for any provider that gives you a host, port, username, and password.
- Plunk — an email-sending service you hold your own account with.
All three send unlimited volume on your own account and never count against your HARi plan allowance.
Gmail is not on that list, and deliberately so: a connected Gmail account brings mail into HARi and puts it on the right contact’s timeline, but HARi does not send campaigns through it. See Unified inbox and connected channels.
Related
Section titled “Related”- Email Sending — the one page all four methods are chosen and set up on
- Email sending allowance — the exact monthly, daily, and hourly numbers per plan
- Email setup — templates, tracking, and sending from a record
- Why are my emails not sending? — diagnosing a failed send