
Connect your own SMTP server to send email from HARi
If you already have a mail server, or an email provider that gives you SMTP credentials, HARi can send through it. You enter five details — host, port, username, password, encryption — plus the address the mail should come from, then send yourself a test. Sending stays on your own account, so the volume is unlimited and never touches your HARi plan allowance.
SMTP is simply the standard language mail servers speak to each other. Your provider hands you an address and a login for their server; you give those to HARi, and HARi hands your outgoing mail to it.
Where to find your SMTP details
Section titled “Where to find your SMTP details”Your email provider publishes them, usually on a help page called SMTP settings, Mail client setup, or Manual configuration. If you already have email working in a desktop mail app such as Outlook, Apple Mail, or Thunderbird, the same values are in that app’s account settings under outgoing mail server.
You need five things:
| Setting | What it is | Typical value |
|---|---|---|
| Host | The address of your provider’s outgoing mail server | smtp.yourprovider.com |
| Port | The numbered door on that server that accepts mail | 587 (with TLS) or 465 (with SSL) |
| Username | Who you log in as. Very often your full email address | you@yourcompany.com |
| Password | The password for that login — see the warning below | — |
| Encryption | How the connection is protected in transit | TLS (recommended) |
Important — If your email account has two-factor authentication switched on (and it should), your normal password will be rejected. Providers issue a separate app password for exactly this case: a long, single-purpose password you generate in your account’s security settings and paste into HARi. Generate one there, use it here, and revoke it if you ever stop using HARi. Your everyday password stays untouched.
Prefer port 587. It is the port the internet standard reserves for exactly this job: “Port 587 is reserved for email message submission as specified in this document” (RFC 6409, Message Submission for Mail). Many networks and hosting providers block the older port 25 outright, so a connection that times out on 25 will usually work on 587.
Enter the details in HARi
Section titled “Enter the details in HARi”-
Open Settings → Email Sending (called Outbound Email in earlier versions).
-
Open the SMTP card and start a sender. Under Connect your own, click Set up on the Your own SMTP server card — the button reads Manage if SMTP is already in use. Its setup opens inside the card, and that is where the rest of these steps happen. The whole panel is an administrator’s: if you aren’t one, it simply says Only a workspace admin can change this.
Inside the card, click Add SMTP to open the sender dialog. On a brand-new workspace that has never sent email, the same connection fields also appear inline in the card under SMTP Configuration — either route works and both ask for the same things.
-
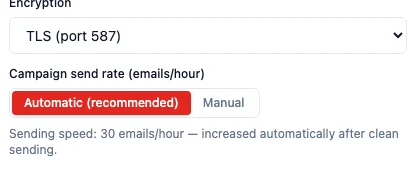
Fill in the five connection fields — Host, Port, Username, Password, Encryption. Choose TLS (port 587) unless your provider specifically tells you to use SSL on 465.
-
Set your From address. This is the address recipients see the email as coming from, and HARi needs it before it will send anything. Add a From name too — a person or company name reads far better in an inbox than a bare email address.
The From address should be on a domain your SMTP server is allowed to send for. Many providers reject a message outright if the From address doesn’t match the account it was sent from.
In the dialog, both fields sit below the connection fields. If you’re using the inline form on a brand-new workspace instead, they’re in the Account-wide sending settings block further down the page.
-
Leave the campaign send rate on Automatic (recommended). HARi then starts at a conservative pace and speeds up on its own as your mail keeps landing cleanly.
-
Save it. The dialog’s button reads Add sender; the inline form’s reads Save changes.
-
Send a test email to yourself from the same page and confirm it arrives. If it doesn’t, work through When it doesn’t work below — do this before you build a campaign, not after.
What this method costs you
Section titled “What this method costs you”Nothing on the HARi side. Mail sent through your own SMTP server is unlimited and never draws on your plan’s sending allowance or your credits. You already pay your email provider; HARi has no reason to meter it again.
What HARi does do is pace bulk campaigns, spreading them out instead of handing your server thousands of messages in one burst. That protects two things at once: your provider’s own rate limits, and your domain’s reputation. Pacing never applies to one-to-one emails, replies, or test sends — those go immediately.
Sending from your own domain
Section titled “Sending from your own domain”If your From address is on your own domain — and it should be — receiving mail servers will check whether that domain has actually authorised your provider to send for it. Without that authorisation your mail looks like a forgery of your own brand and gets filed as spam. This is not optional at any real volume: since February 2024 Google has required “email senders who send more than 5,000 messages per day to Gmail accounts” to publish SPF, DKIM, and DMARC records, and to “Keep spam rates reported in Postmaster Tools below 0.30%” (Google, Email sender guidelines). Microsoft applies the same requirement to Outlook.com.
Three records do the job. Add them at whoever manages your domain’s DNS — usually the company you bought the domain from, or your web host. Your email provider supplies the specific values; only the shapes are standard.
| Record | Type | Name | What to put there |
|---|---|---|---|
| SPF | TXT | your domain, often entered as @ | A single line naming your provider, in the form v=spf1 include:your-provider.example ~all. Your provider tells you the exact include: value. If you already have an SPF record, edit it — add the include to the existing line rather than creating a second SPF record. Two SPF records on one domain break both: the standard says “A domain name MUST NOT have multiple records that would cause an authorization check to select more than one record”, and a domain that does gets a permanent error instead of a pass (RFC 7208). |
| DKIM | CNAME (usually) | selector._domainkey — your provider gives you the selector | The value your provider gives you, copied exactly. Some providers issue two or three of these; add all of them. DKIM is the signature that proves the mail really is authorised by your domain. |
| DMARC | TXT | _dmarc | Start with v=DMARC1; p=none; rua=mailto:dmarc@yourdomain.com. p=none means “monitor only, don’t change how you treat my mail” — the safe starting point. Once you can see from the reports that your legitimate mail passes, tighten it to p=quarantine and later p=reject. |
DNS changes can take up to 24 hours to spread across the internet, though most providers publish within minutes.
HARi will check them for you. At the bottom of the Your own SMTP server card there is a Sending Domains panel: add your domain there and it lists these same three records — with your own domain filled in, and a placeholder where your provider’s value goes — each with a pass-or-fail SPF / DKIM / DMARC badge and a Verify button. It is the quickest way to see which record is still missing.
Tip — Start DMARC at
p=none. Jumping straight top=rejectbefore you know your own mail passes is how businesses accidentally make their invoices and password resets vanish. Monitor first, tighten later.
When it doesn’t work
Section titled “When it doesn’t work”| What you see | What it usually means | What to do |
|---|---|---|
| Authentication failed, or “invalid credentials” | Two-factor authentication is on, so your normal password is refused | Generate an app password in your email account’s security settings and use that instead |
| Authentication failed with the right password | The username isn’t what you think | Try your full email address as the username; some providers want just the part before the @ |
| The connection times out, or is refused | The port is blocked, or it’s the wrong one | Switch to port 587 with TLS. If your host blocks outbound SMTP entirely, use HARi Email or Plunk instead — neither needs an open SMTP port |
| An encryption or certificate error | The port and encryption don’t match | Pair 587 with TLS, or 465 with SSL. Mixing them fails |
| The server rejects the sender address | Your From address isn’t one this account may send as | Set the From address to an address on the same domain as the SMTP account, or ask your provider to authorise it |
| The test email arrives, but a campaign stalls | You’ve hit a rate limit at your provider | Set the campaign send rate to Manual and enter the hourly number your provider allows |
| Mail sends successfully but lands in spam | Your domain isn’t authenticated yet | Add the SPF, DKIM, and DMARC records above, then send another test |
| Everything worked, then stopped | The password or app password was rotated or revoked | Generate a new app password and update it in HARi |
Two things tell you where a send actually got to, so you are not guessing. A test send reports success or the server’s own error message straight back to you on the settings page — that error text is usually the fastest diagnosis you will get, so read it rather than retrying blindly. For a campaign, open its statistics to see what was delivered, what bounced, and what was rejected. Why are my emails not sending? works through the rest.
Related
Section titled “Related”- Email Sending — the one page all four methods are chosen and set up on
- HARi Email — the sending method included with your plan, no SMTP needed
- Outlook / Microsoft 365 — sign in once instead of managing credentials
- Plunk — a dedicated sending service on your own account
- Email sending allowance — why your own server is unlimited
- Why are my emails not sending? — diagnosing a failed send