
Email Sending — choosing how HARi sends your mail
Everything about how your email leaves HARi is on one page: Settings → Email Sending. The page asks one question first — which method should send your mail — and then opens that method’s setup inside the same page, including the DNS records that prove the domain is yours. There are four methods, and one of them is included with your plan.
You only ever set up the one you choose. Setting sending up happens on this one page — for a mailbox you signed in to, re-syncing, disconnecting and its sending speed stay on Connected Channels, and the page links you there.
Where sending is set up
Section titled “Where sending is set up”Settings → Email Sending. One page holds the method chooser, each method’s credentials, both domain-authentication flows, your list of senders, and a test send.
Two things are worth knowing if you have used HARi for a while. This page was called Outbound Email in earlier versions. And domain setup used to sit on a separate Sending Domains page — it is now part of each method’s own setup, so an old link or bookmark to it simply lands here.
The page appears in the settings menu for workspace administrators. Connecting a mailbox of your own doesn’t need admin rights, and if you aren’t an administrator, Connected Channels is where you do that — see If you aren’t an administrator below.
Which method should send your mail?
Section titled “Which method should send your mail?”The methods are in two groups. Included with your plan holds the one HARi runs for you. Connect your own holds the three that send through a mail account you already have — “unlimited volume, billed by whoever provides it — never counted against your plan”, as the page puts it.
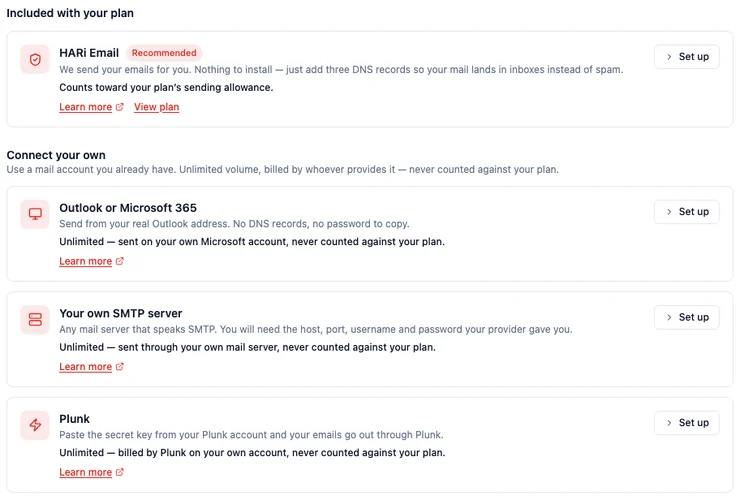
| Method | Choose it when | What it costs you | What setting it up involves |
|---|---|---|---|
| HARi Email — marked Recommended | You want to send today and have nothing to sign up for | Counts toward your plan’s sending allowance | HARi runs the delivery side; you add three DNS records for your domain. Set up → |
| Outlook or Microsoft 365 | Your team already works in Microsoft 365 | Unlimited, on your own Microsoft account | Sign in with Microsoft once. No DNS, no password to copy. Set up → |
| Your own SMTP server | Your provider gave you a host, port, username and password | Unlimited, through your own mail server | Five connection fields plus your From address. Set up → |
| Plunk | You want a dedicated sending service, with opens, clicks and bounces flowing back | Unlimited on HARi’s side; Plunk bills you | Paste one secret key. Set up → |
Gmail is not on the list, and that is deliberate — see Gmail brings mail in, but doesn’t send below.
Nothing forces one choice for good. Adding a second method later doesn’t undo the first, and each sender you connect stays on the page with its own address.
What a method card tells you before you click
Section titled “What a method card tells you before you click”Every method is a card, and each card answers three questions on sight:
- What it is — the method’s name and one plain line on how it sends.
- What it costs you — HARi Email reads “Counts toward your plan’s sending allowance.” the other three each name the account the mail goes out on and say it is never counted against your plan. No method hides its billing behind a click.
- Whether it is already working — a green In use badge, plus a line such as “1 sender using this method” or, for HARi Email, “Ready to use”.
The button on the right reads Set up on a method you haven’t configured, Manage on one already in use, and Hide while its setup is open. Learn more opens that method’s full guide on this site.
The page opens a method you already have set up, so you land on something in use rather than on a wall of cards. One setup panel is open at a time.
Setting up a method, step by step
Section titled “Setting up a method, step by step”-
Open Settings → Email Sending.
-
Click Set up (or Manage) on the method you want. Its setup opens inside the card.
-
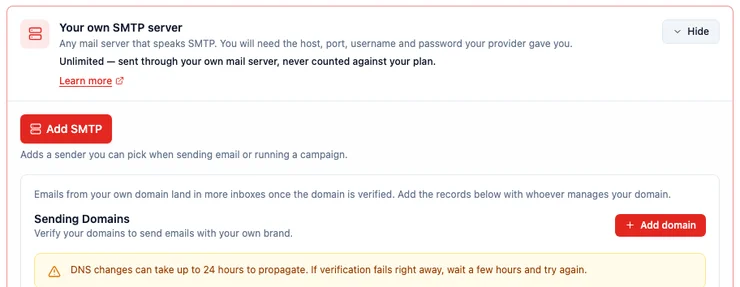
Complete that method’s setup, in place. Outlook is a single Connect Microsoft 365 button and a Microsoft sign-in. SMTP and Plunk open a short dialog — Add SMTP or Connect Plunk — for the credentials and the From address. HARi Email needs no credentials at all: it is provisioned for your workspace by the HARi team, and the card shows your delivery details plus the domain records to add.
-
Send yourself a test. Every connected sender carries its own Test send button on its card, and where account-wide sending settings apply there is also a test box you can point at any inbox. A failed test reports the server’s own error message straight back to you, which is usually the fastest diagnosis you will get.
-
Decide which sender is the default. Under Your senders and mailboxes at the bottom of the page, the star on a sender’s card sets it as the one outgoing mail leaves through — My default for a mailbox you connected yourself, Workspace default for a shared one. The same card carries Test send, Edit (for SMTP and Plunk credentials), and Disconnect.
That is the whole path: one page, one chooser, one setup, one test.
Where domain authentication lives now
Section titled “Where domain authentication lives now”Proving that you own the domain you send from is part of setting up a method, not a separate errand — so each domain flow sits inside the method it belongs to.
- HARi Email — a guided flow for three CNAME records, generated for your domain with a copy button on each, then a Verify button per domain. It appears once managed delivery is provisioned for your workspace, and it is an administrator’s action. Full walkthrough: HARi Email.
- Your own SMTP server and Plunk — a Sending Domains panel that checks SPF, DKIM and DMARC — the DNS records that prove the domain is yours — for a domain you send from on your own account, each with a pass-or-fail badge and a Verify button. Walkthroughs: SMTP and Plunk.
How fast campaigns go out
Section titled “How fast campaigns go out”The your own SMTP server panel also carries a campaign send rate, with Automatic recommended: HARi paces bulk sends at a speed that climbs on its own after a stretch of clean sending, and the current figure is shown on the card. Switch to Manual to set an emails-per-hour number yourself — the default of 30/hour is roughly one email every two minutes, and 0 removes the limit. It applies to bulk campaign sends only; transactional and test emails are never throttled. For a mailbox you signed in to, the equivalent speed is on Connected Channels instead.
Both flows are on the page at the same time, under different methods, because a domain is authenticated differently depending on who sends the mail. If you are looking at three CNAMEs and expected SPF and DMARC — or the reverse — you have the other method’s card open.
Why authenticating your domain is part of setting up sending
Section titled “Why authenticating your domain is part of setting up sending”Because a From address proves nothing on its own. Anyone can type you@yourcompany.com into the From line, so receiving mail servers ignore the address and check the domain’s DNS instead, for a published statement that this sending server is authorised. Without it, your mail looks like a forgery of your own brand and is filed accordingly.
This stopped being optional in 2024. Google requires that “email senders who send more than 5,000 messages per day to Gmail accounts must meet the requirements in this section” — SPF and DKIM authentication on the sending domain, a DMARC record, and “Keep spam rates reported in Postmaster Tools below 0.30%” (Google, Email sender guidelines). Microsoft applied the same bar to Outlook.com from 5 May 2025, first routing unauthenticated high-volume mail to Junk and then refusing it outright with 550; 5.7.515 Access denied, sending domain [domain] does not meet the required authentication level (Microsoft, Outlook’s New Requirements for High-Volume Senders).
That 0.30% threshold is measured per domain, which is the practical argument for verifying yours: once your mail is authenticated, the good behaviour of your sending accrues to your own domain instead of being lost in an anonymous pool.
How do I send campaigns from more than one address?
Section titled “How do I send campaigns from more than one address?”Add each address as a campaign sender under Settings → Email Sending → Campaign senders, then pick one per campaign in Send from. A campaign sender is a display name plus an address — for example Acme <hello@acme.com> for business mail and Sarah | Acme Café <sarah@acme.com> for the café’s newsletter. Administrators manage the list; everyone who builds campaigns can use it, and nobody types a From address by hand.
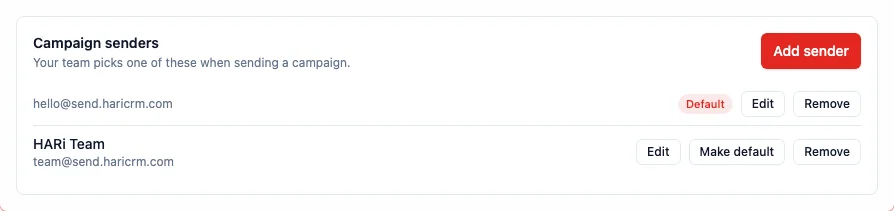
- Adding a sender — click Add sender, type the name people should see in their inbox, and the part of the address before the @. The domain comes from a list of the domains you have verified, so a campaign can only ever go out from an address your domain records vouch for.
- The default sender — one sender carries a Default badge. A new campaign starts with it, a quick send from a contact’s page uses it, and it is your workspace’s From address everywhere else. Make default moves the badge.
- Removing a sender — Remove takes it off the list. HARi won’t remove the default, or a sender a scheduled or sending campaign is still using; it tells you which campaigns to change first.
Senders matter for deliverability as much as for branding. Gmail requires anyone sending more than 5,000 messages a day to its users to authenticate their domain with SPF, DKIM and DMARC (Google’s email sender guidelines). Because every campaign sender sits on a verified domain, every address on the list passes those checks — the second address doesn’t cost you any reputation the first one has.
Picking a sender for a campaign
Section titled “Picking a sender for a campaign”In the campaign editor, Send from lists your campaign senders first, then any mailbox you have connected yourself. Choose one and the line underneath confirms exactly what recipients will see: “Sends as HARi Team <team@send.haricrm.com>”.
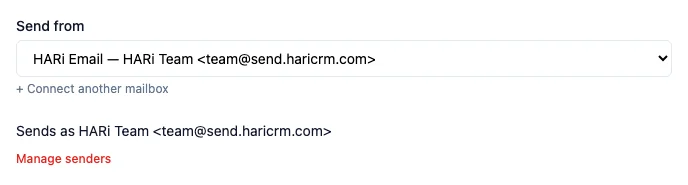
- Team members without admin rights see the same list and can use any sender on it — they just don’t get the Manage senders link.
- A campaign saved before senders existed keeps its From address if it matches a sender on the list. If it doesn’t, the editor asks you to pick a sender before the campaign can be sent or scheduled.
- “Send from each recipient’s owner” (under the campaign’s advanced options) still works: each recipient gets the email from the person who owns their record, as long as that person’s address is on your verified domain.
Gmail brings mail in, but doesn’t send
Section titled “Gmail brings mail in, but doesn’t send”A connected Gmail account brings mail into HARi and puts it on the right contact’s timeline — but HARi does not send campaigns through Gmail. Rather than leaving you to wonder where the Gmail option went, the page says so: if you have a Gmail account connected, it appears in a receiving only note listing the connected addresses, with a link to manage them. Pick one of the four sending methods above for outgoing mail. See Unified inbox and connected channels.
What the page shows you whichever method you use
Section titled “What the page shows you whichever method you use”- Your hourly email limit — the most your account can send per hour, at the top of the page. It is set at the account level by the HARi team; contact support if it is too tight for how you work.
- Your daily email limit — inside the HARi Email card, because the daily cap applies to HARi’s own delivery. Sending on your own account isn’t metered by HARi at all. The numbers per plan are in Email sending allowance.
- Your senders and mailboxes — every mailbox you have connected, whichever method it belongs to, each with its address, its default-sender star, a test send, and a disconnect. Channels that can only receive (WhatsApp, Telegram, SMS) are listed too, labelled Inbound only, with no sending controls offered on them.
- A test send before you build a campaign, so delivery is proven rather than assumed.
- Delivery feedback, on Plunk — the Plunk card holds the webhook address to paste into Plunk, a live event log of opens, clicks and bounces, and recent campaign results. Because those come from administrator-only sources, they are shown to administrators only: an empty event log always means an empty log, never “you weren’t allowed to see this”.
If you aren’t an administrator
Section titled “If you aren’t an administrator”Sending is mostly an administrator’s job, and the page is honest about which parts are:
- Connecting your own Outlook mailbox does not need admin rights. Any user can connect theirs, and HARi will send as them from their real Outlook address. The settings-menu entry for Email Sending is administrators-only, so start from Connected Channels instead.
- SMTP and Plunk are administrator panels. Open one without admin rights and it says “Only a workspace admin can change this. Ask an admin to set it up for you.” — rather than showing a form that would be refused on save.
- The account-wide sending settings are administrator-only too. Instead of a status it cannot read, the page says who owns them: “Only a workspace admin can see or change the account-wide sending settings. You can still connect your own mailbox above.”
How do recipients unsubscribe?
Section titled “How do recipients unsubscribe?”They open the link in the campaign and confirm on one page. They do not sign in. The steps, the preference page, and the Unsubscribed count are in How do recipients unsubscribe from a HARi campaign?.
Related
Section titled “Related”- How do recipients unsubscribe from a HARi campaign? — the confirm page, preferences, and the Unsubscribed count
- HARi Email — the method included with your plan, and its three DNS records
- Outlook / Microsoft 365 — sign in once and send as yourself
- Your own SMTP server — host, port, username, password, encryption
- Plunk — one secret key, plus delivery events back into HARi
- Email sending allowance — what counts against your plan, and what doesn’t
- Unified inbox and connected channels — receiving mail and connecting your own mailbox
- Why are my emails not sending? — diagnosing a failed send